How To Personalize Starbucks Cold Cup Decals In Cricut Design Space
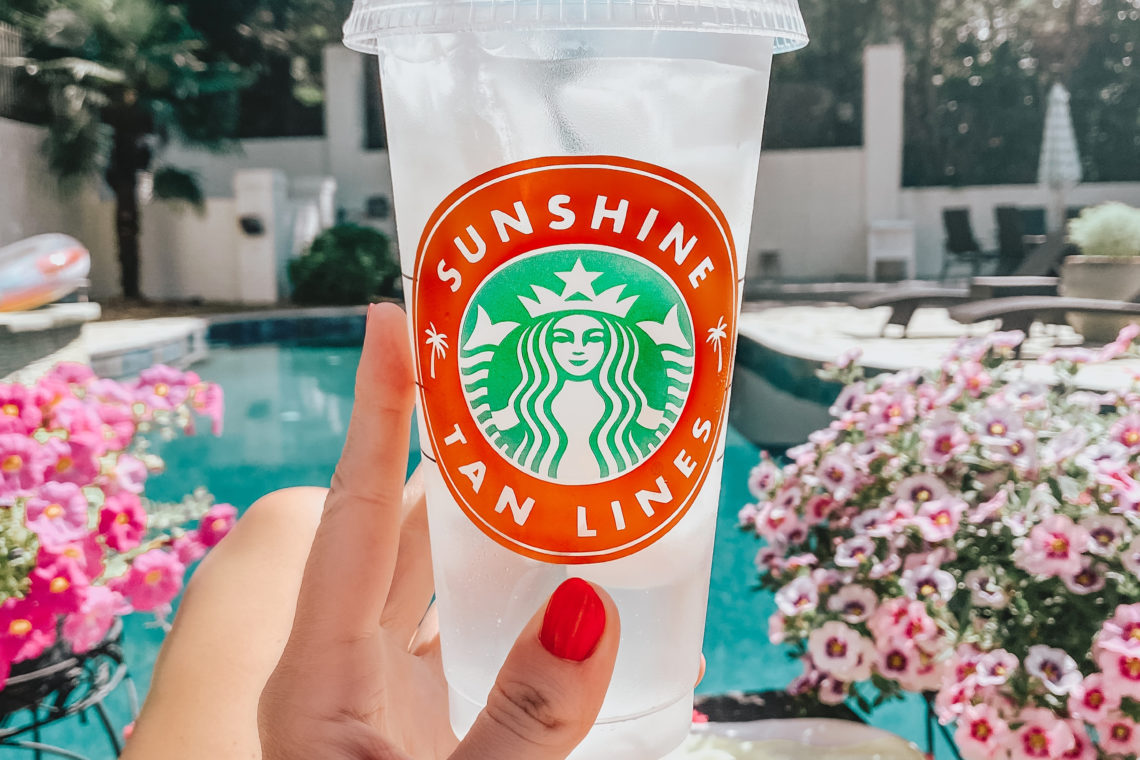
Hi, crafters! This tutorial is LONG overdue and I finally have enough free time on my hands to get it done! Today, I’ll be walking you through the steps to add your own wording to the blank Starbucks cold cup decal in Design Space. If you’re a Silhouette user, I’m working on that post next so stay tuned!
Step One: Upload Decal
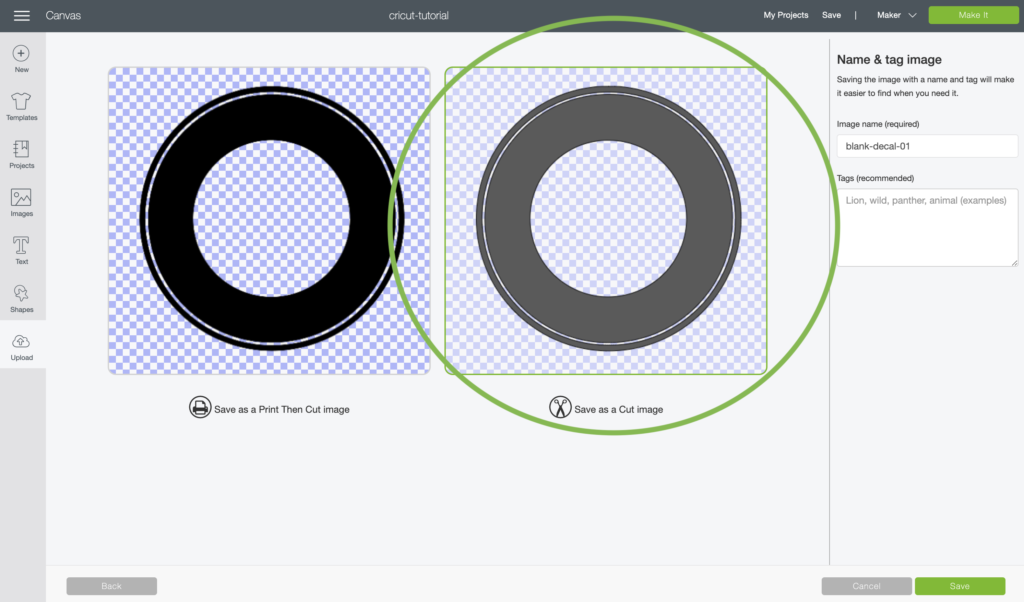
Download the blank circle decal here and upload it into Design Space. It’s a transparent .PNG file so there should be no white space when you upload it, just make sure to save the file as a CUT IMAGE and not a PRINT THEN CUT IMAGE.
Step Two: Setup Text
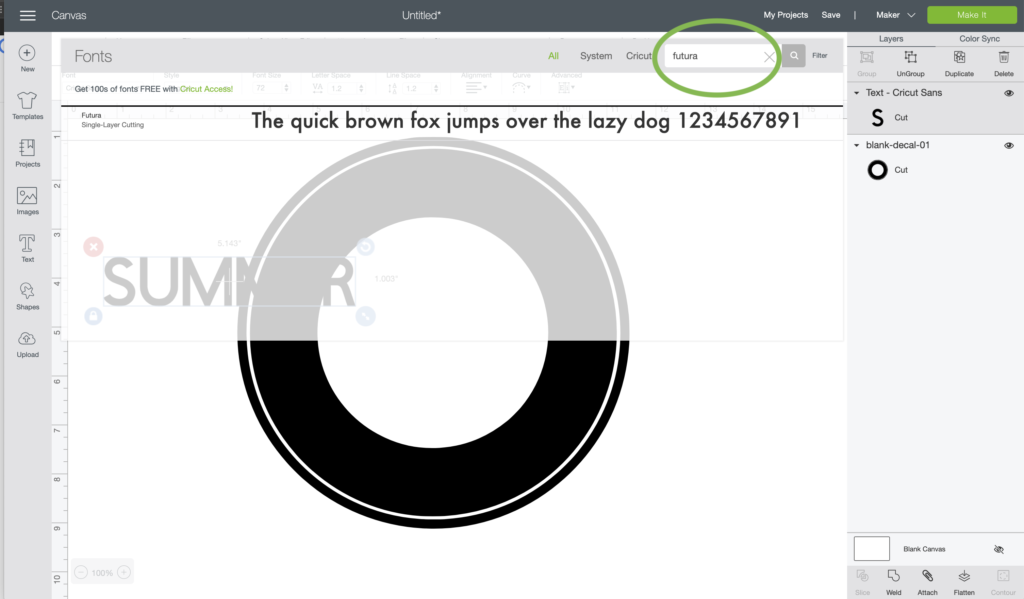
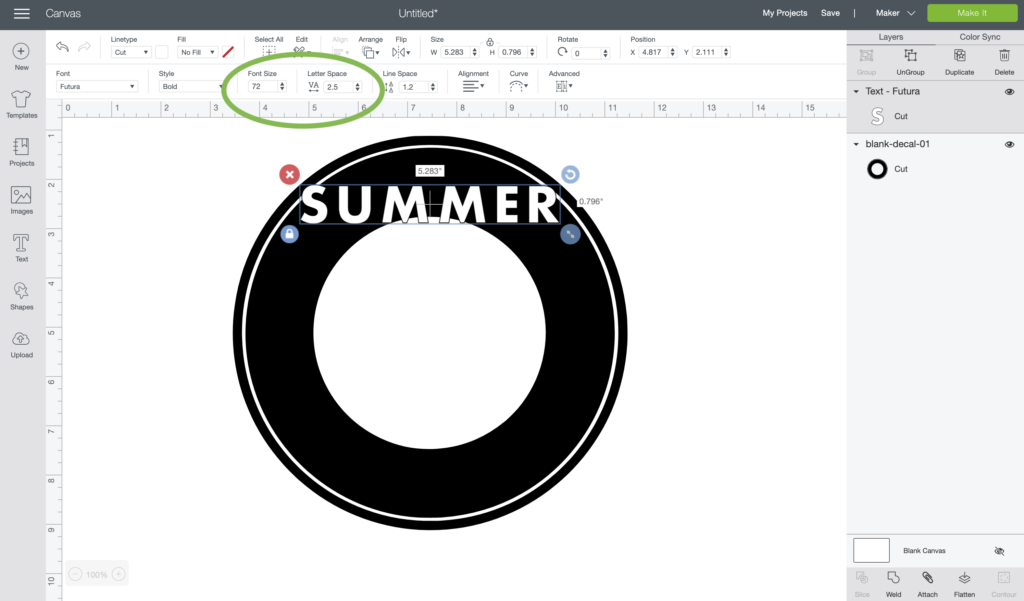
Next, use the text tool to type the word(s) you want to place on the top half of the decal and change the font to “Futura”.
*I use the font “Aharoni Bold” when creating decals in Adobe Illustrator but it isn’t compatible with Design Space. Futura is extremely similar.
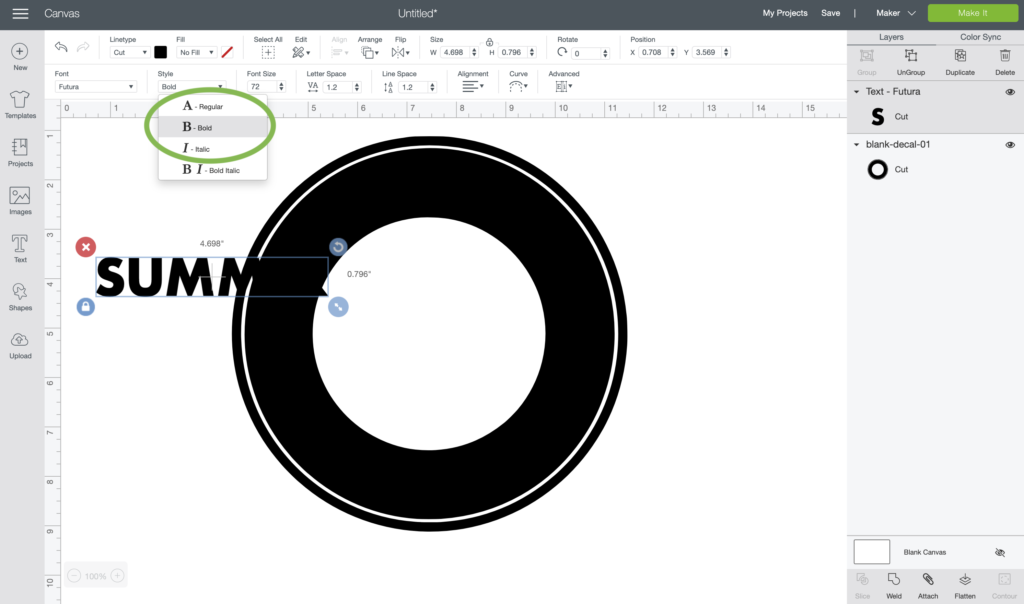
Now click the font style tool and select Bold.
Adjust the font size and space the letters out to 2.5.
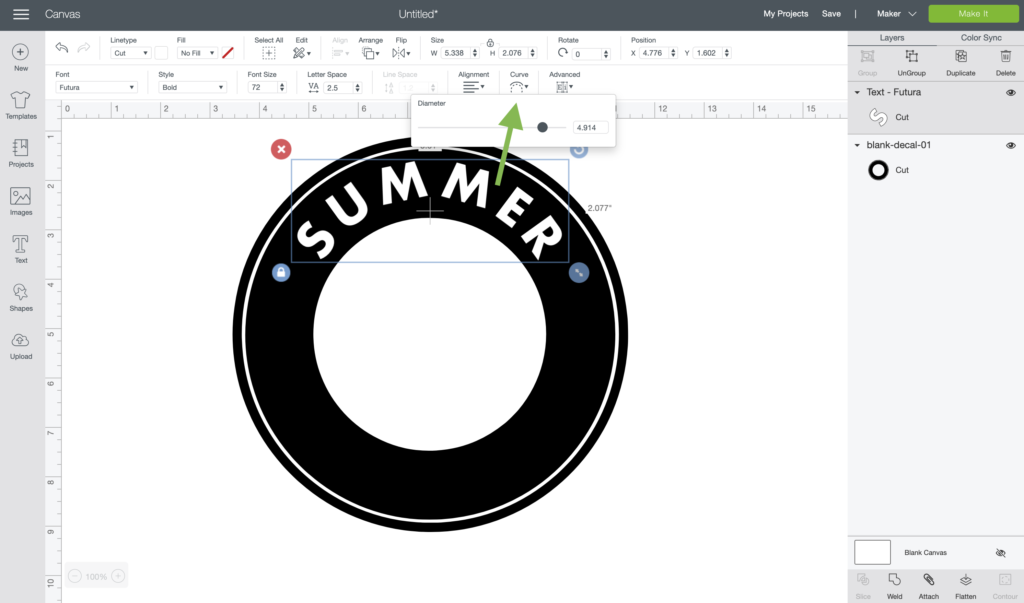
Now you can use the curve tool to adjust the curve of the text. The curve will be different for every word or group of words. Just move the slider until you like the way it looks.
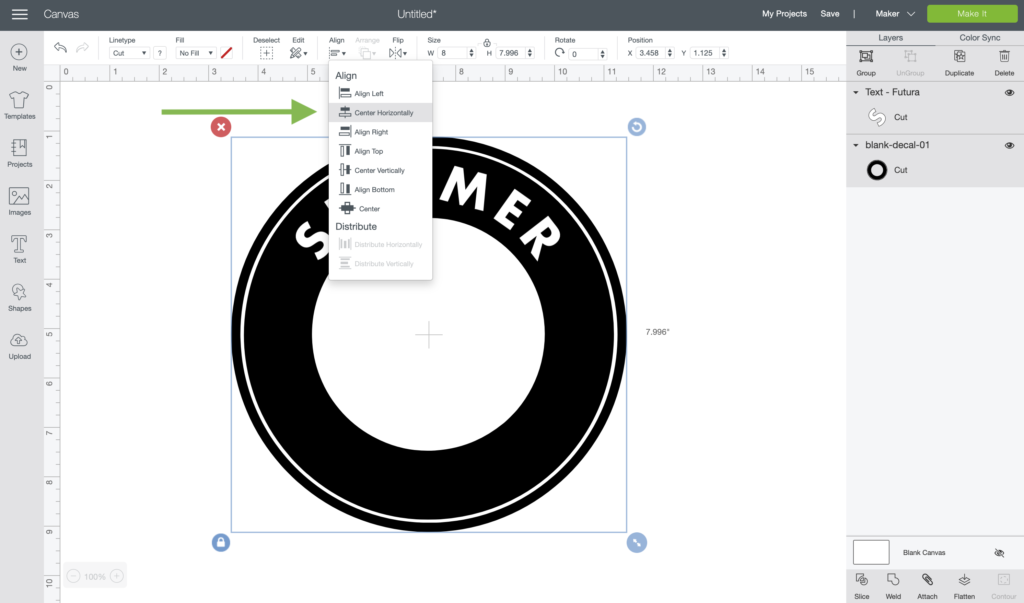
Once you have the text curved make sure it is centered on the decal by using the align tool. You have to select both the decal and the word and then click “center horizontally“.
Step Three: Using The Slice Tool
At this point you need to select both the decal and the text again and click the slice tool in the bottom right corner.
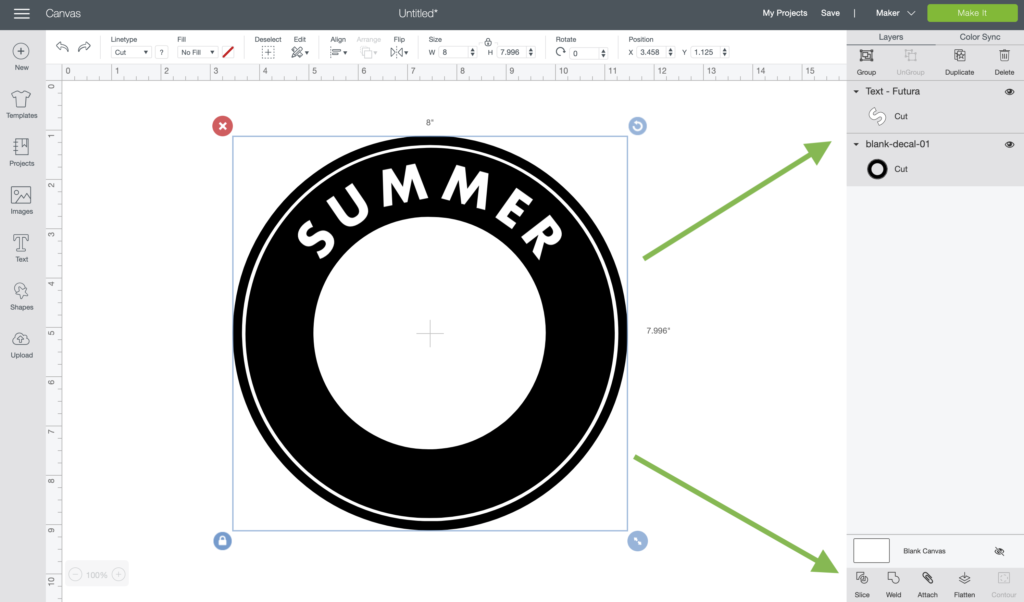
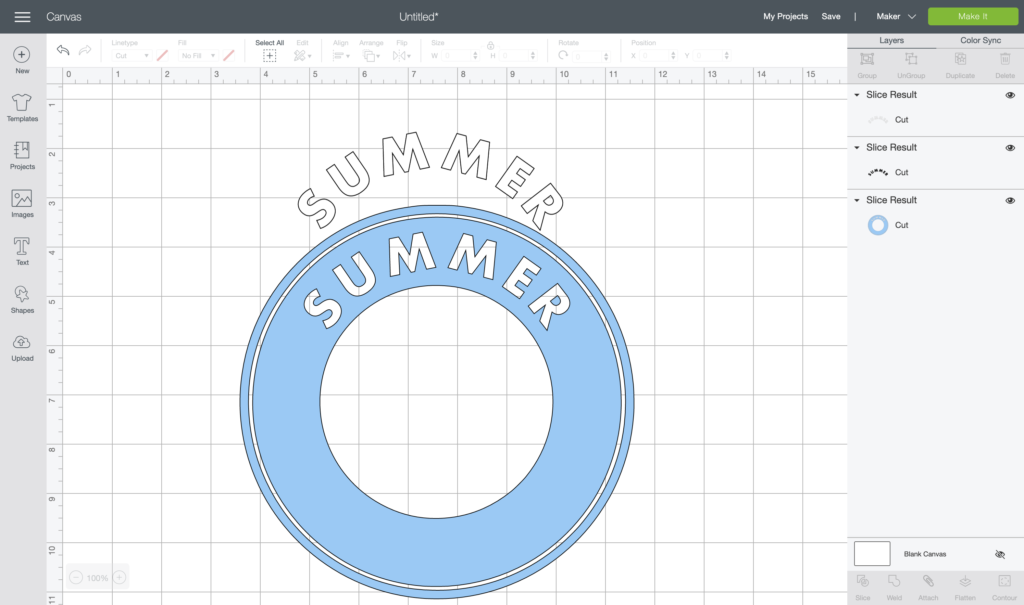
The slice tool is basically like a cookie cutter, whatever is on top will be cut from the bottom layer. So in this case, the word summer was cut out of the circle.
You can now delete the two layers of text and you should just have the circle with the word cut out.
Step Four: Repeat Process
Now, repeat the process for the bottom half of the decal.
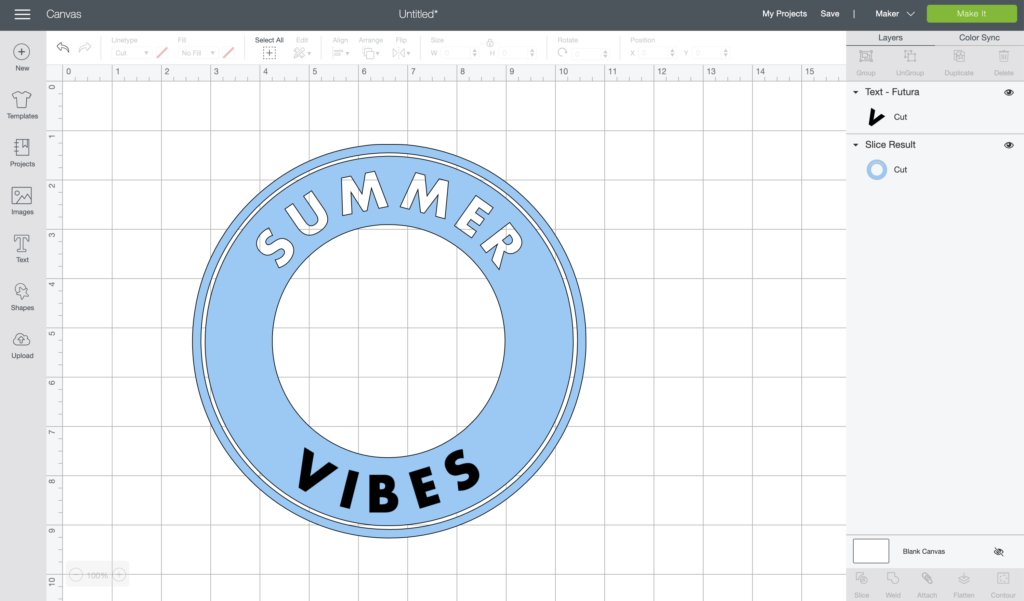
When you’re finished you should have a decal with both sets of words cut out.
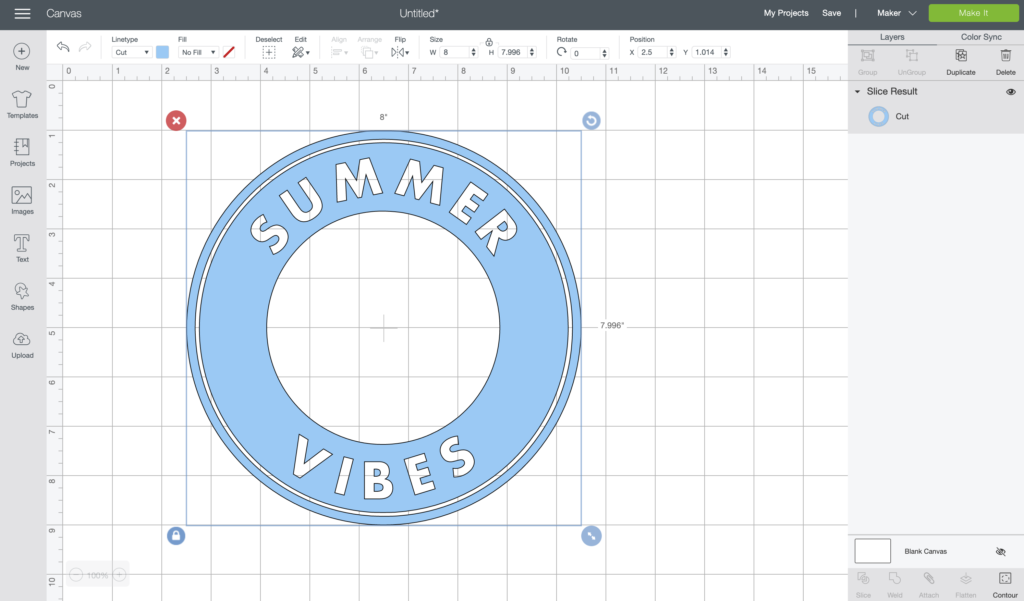
Now you can add whatever shape you’d like to the sides. I used the shapes tool to add stars and then sliced them just like I did the text.
Remember, you can only slice two layers at a time so if you try to add all of the words at once and then slice, it won’t work.
Step Five: Adjust Size
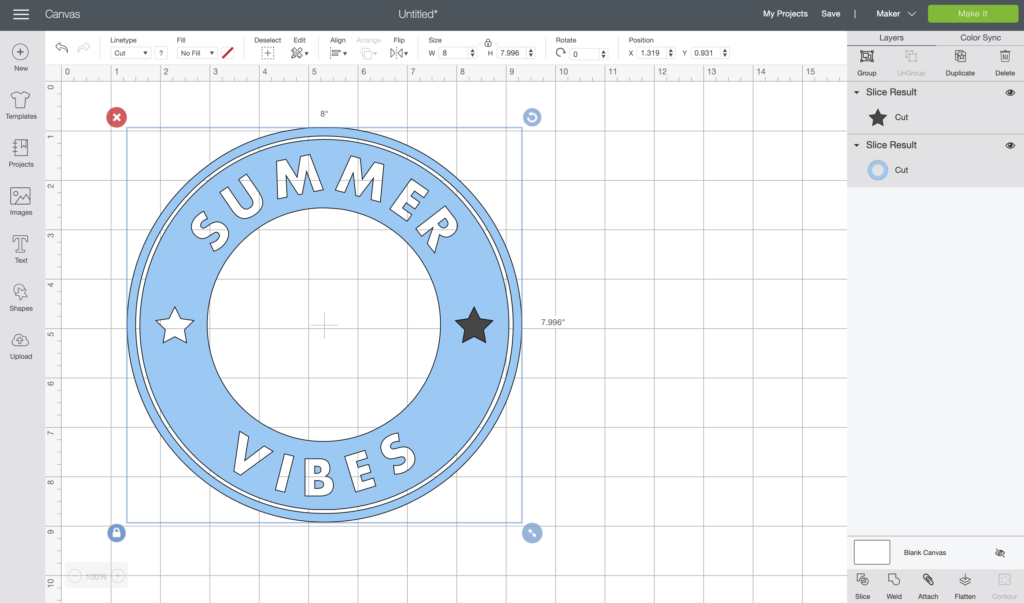
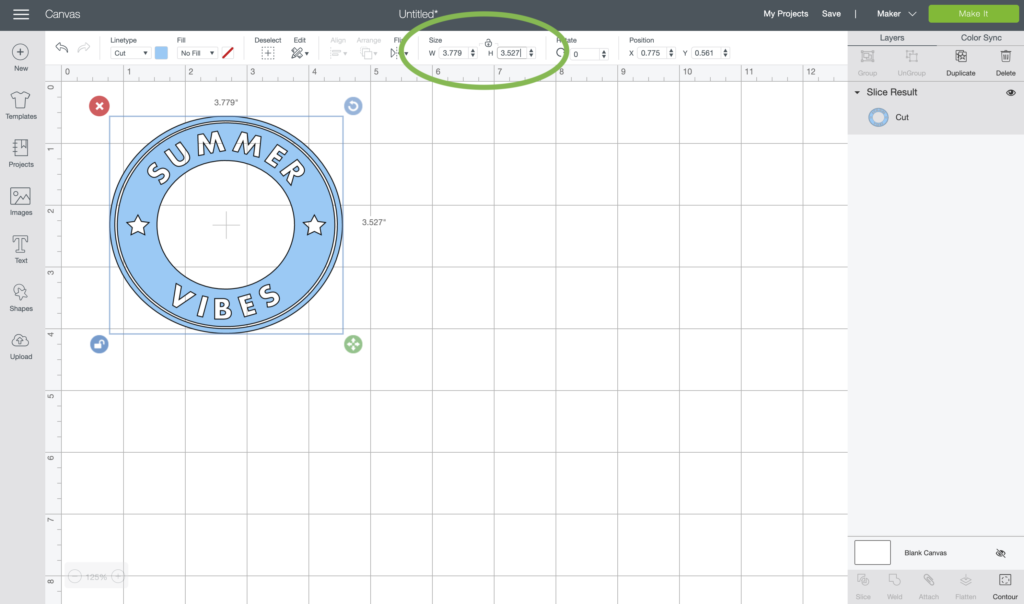
The last step is to resize the decal to fit the cup. The dimensions below have worked for me for the last year but lately people have messaged me saying the logo on the cup has gotten larger. Starbucks is constantly updating products so I don’t doubt that they increased the size of the logo. For the best fit, measure the height and width of the logo on your cup and go by that.
For best results be sure to use a quality adhesive vinyl like Oracal 651. Expressions Vinyl has the best selection of Oracal 651 and you can use code kaylamade to save 10% off of your order.
If you have any questions just leave a comment or send me an email!



Diana
Thank you so much for posting this 🙂
Kayla
You’re welcome!! Hope it helps!
Azucena
omg..this is amazing! Definitely trying this out this week! Thanks a bunch!
Kayla
Thank you!! I appreciate it so much!!
Lizette
You are the. Best. Thank you!
Kayla
Aw, thank YOU! Hope it was helpful!
Denise
Can’t wait for the Silhouette version! So excited!!!!
Allie
Hi I was wondering if you could make a dog mom one for a Cricut, that isn’t print than cut? I am still trying to figure out print and cut thanks!
Kayla
Hi Allie, none of the downloads on the site are print then cut designs. They are all .PNG files. Check out this post to learn how to upload .png files into design space and save them as cut files. https://kaylamakes.com/2019/05/14/uploading-free-downloads-design-space-new-freebies/
Mela
Hi I looked on your Website websiteand I loved it can I plz have a cup of you see this the Design what I want is Louis Vuitton and Starbuck logo thx plz reply
Kayla
Hey, I don’t sell the cups. I design the cut files for people who sell them. Check Etsy to find cups for sale! 🙂
Mela
Thx for telling me
Michele
I’m getting the ring around the outside? I’m a noob, maybe I’m doing something wrong 🙈. I sliced mermaid scales into it.
Kayla
Hmm. Not totally sure what you mean, you can send me a screenshot via email and I’ll try to help! kayla@kaylamakes.com
Kayla
Can you create the sunflower design for the Starbucks cups please?
Kayla
Of course! 🙂
Jessica Magana
Hello, I just had a question, How do you insert a cross image instead of a star or heart?
Kayla
Hey! Just search google for the image you need as a vector or png. Like, “cross vector file” and then when you find one you like save the image to your desktop and upload it into design space. Open it on the canvas with the decal and resize it to fit then use the slice tool.
Whitney
Have you made a Texas Aggies or photographer design?
Kayla
I can totally add those!
Kari
Hi. Do you still offer the Lakeside vibes design freebie? I didn’t see it but wanted to double check before I tried to follow the tutorial above! Thanks 🙂
Cydney
Does it matter what color vinyl paper you use? How do you get it to stick to the cup?
Kayla
Hey there! The color doesn’t matter at all, just sure you’re using a quality permanent vinyl brand such as Oracal 651. The vinyl decal is like a really strong sticker so it’s self adhesive and sticks to the cup! 🙂
Kari
Hi. Do you have the lakeside vibes available to download? I would love to make a cup with that one. I’m having trouble finding the suggested fonts in the tutorial on any of the fonts websites or design space. Thanks!
Kayla
Hey! Just added lakeside vibes to the free downloads page! 🙂
CYNTHIA
HII KAYLA, IM SO FRUSTRATED. I CANT SLACE THE SECOND PART. I TRY SO MANY TIMES ANS I JUST CANT. PLEASE HELP ME!
Kayla
Hey! Email me and I’ll try to help! kayla@kaylamakes.com
Jackie
Kayla, thank you so much for this step by step guide. I just bought a Cricut Joy and am trying all types of projects. This was perfect.
Kayla
I’m so glad it was helpful! Thank YOU!
Tammie
Hi Kayla,
Thank you so much for the free downloads ! you are amazing and such an insperation.
I can not find the futura font in design space. is there any other suggestion ?
Kayla
Hey! Futura is a free font so you should be able to download it with a quick google search. Then it will show up in Design Space. You can also try these similar sans serif fonts: Neuzeit, Twentieth Century, Harmonia Sans, Ano, ITC Avant Garde Gothic, FF Super Grotesk.
Thank you so much, happy you’re here!
carmen reyes
HI KAYLA, THANK YOU FOR THE DESIGNS. IM USING THE BLANK LABEL ONE TO CREATE A LABEL BUT IT won’t ALLOW ME TO SLICE. I NEED HELP WITH THIS ONE.
Kayla
Hey! If you have more than two layers selected it won’t let you slice. You can email me and I’ll try to help, kayla@kaylamakes.com
mayra
thank you so much! just made my day easier .
Kayla
Yay!! You’re so welcome!
Tammie
Thank you so much!!
Erica
I love your designs! Do you seal your cups?
Kayla
I don’t seal mine bc I don’t sell them. I have heard of sellers using epoxy to seal theirs!
Taylor
Hey! Just wondering if you could make an oily mama design for the Starbucks cold cup!
Kayla
I sure can! Stars on the sides?
Taylor
Yes please! Thank you so much!
Elizabeth
Thanks so much for posting. This really helps
Kayla
You’re welcome! So glad it was helpful!
Jamie Sivertsen
Hi!
This may be a silly question but which tumblers do you use for these designs? Where can I get them? Do you have to get them from starbucks or is there someplace to order them online?
Kayla
Hey! Not silly at all, they do come from Starbucks! You can get similar ones for cheaper from amazon, they just won’t have the Starbucks logo on them.
Jenn
I saved the circle template on my phone and uploaded into design space. It looks really big – over 20” to be exact lol. What should the measurements of the ring be? I saw that the font should be 2.5”. Or should I just try from my computer instead? Thanks so much for your free designs and help! I’m so excited to make some for my friends at work 🙂
Jenn
Annnnd right after I posted this I found your blog post with measurements 🤦🏼♀️. Sorry about that and thank you for being so thorough! New to your page and excited to learn it all!
Kayla
Haha thank you!! I’m glad you found it! Let me know if you need anything else!
Sam
Hello, can you explain how to add the ‘you need to calm down’ text around the circle? Thanks
Kayla
Hey! I have a post on that here: https://kaylamakes.com/2020/05/27/how-to-personalize-starbucks-decals-in-design-space/
But that one is also available as a free download. 🙂
Tammie McGovern
Hi Kayla,
Trying to find your email address for a question.
And to maybe send a photo of what I’m having trouble with.
The spacing between letters just doesn’t look right and of course when I try to fix it by moving the letters individually closer together it won’t slice, I’ll assume because then it’s more than one layer, even though I group the letters back together.
Kayla
Hey! Email is kayla@kaylamakes.com!
Tammie McGovern
Thank you, I’ll email right away !
Disneymom
Hi Kayla, do you know how we can curve in DS on iPhone or iPad?
Kayla
Sadly they haven’t added the curve feature to the app yet. 🙁
Skyler
Hello!
Thank you for all the great ideas and awesome files!
I was curious what type of vinyl you like best for the cold cups. I love my starbucks cup but it sweats a lot, so I was wondering which vinyl held up the best? Thanks!
Kayla
Hey! I’ve had the best results with Oracal 651 and Siser EasyPSV. 🙂
Liz
Hello Kayla , I was wondering the little cup stickers are you able to sale them to other people by making stickers , or you need a license to sale your svgs?
mayeli sanchez
hi, I tried like 20 times and when I press slice it doesn’t work please help me. what am I doing wrong
Kayla
Hey! Do you have more than one line of text selected? You can only slice two layers at a time so just double check that the circle + one other layer are selected.
melissa
hi! some of your free downloads are png, how can I get it as an sag file?
Kayla
Hey! Yeah, all of the older ones are .png files. What do you need as an SVG?
Bree Truesdale
hello! i love your site! thank you for the freebies!! but quick question, for the Starbucks cold cups the templates that you have .. do you have one that says “circuit queen” or “crafting fuel or “messy bun vinyl run” just wondering.. again thank you so much! <3
Kayla
Hey! The circle decals? I do have a Cricut Queen and Crafty Queen!
Angelica arvayo
Hi! I’m trying to curve the word on dealing space using my iphone and it doesn’t give me the option too. Is it not available on iPhone?
Kayla
It isn’t! 🙁 They haven’t added the curve feature to IOS yet.
Angelica arvayo
Design space sorry!
Jessica
Thank you so much for the clear step-by-step tutorial. I made a cup for my best friend’s wedding and she is going to love it!
Kayla
Yay!!
vanessa
Can you add a design instead of text to this???
Kayla
You can!
Caytlyn Militello
It wont let me slice the text what should I do??
Kayla
Try welding the text together before slicing.
Doris Castaneda
Hi Kayla,
I am trying to find the Futura font but its not in my design space, do you have a link to it? Thank you!
Kayla
Hey! Futura is a free Adobe font, you may just need to activate it.
https://fonts.adobe.com/fonts/futura-pt
Taylor B
This literally saved my life!!! I’ve been trying to figure out the correct measurements for MONTHS… Found you on Pinterest! LOVE what you are doing with helping crafters instead of us having to pay for everything!! Definitely using your website for all my SVG needs!