
DIY Your Own Door Mats
So, I have a bit of an obsession with DIY doormats. I change them out with the seasons or just whenever I feel like my front entrance needs a refresh.

I made my first doormat over a year ago and since then I’ve cranked out upwards of 100 mats for customers. Along the way I’ve compiled a list of tips and tricks for making the process easy and successful.
(1) Here’s what I use:
- Blank Coir Mat (target has them for $9.99)
- Paint ( I use outdoor acrylic)
- Oracal 613 (for the stencil)
- Old paint brushes and/or foam daubers
- Cricut Explore Air II or similar
(2) Design Set Up
In Design Space you can pretty much create whatever you want. However, I like to create my designs in Illustrator then import them into DS and resize.

You can’t cut anything larger than 11.5 x 23.5 in Design Space. So I always adjust my height to 11.5 and allow the width to adjust accordingly.
Keep in mind a standard doormat is 18 x 30, so you’ll have a bit of room on either side of your design but you can always cut separate stencils and create a design around the edge.
(3) Cut Settings
When I first started making doormats I used Oracal 651. It worked well but it felt like such a waste of my quality vinyl so I looked around and found Oracal 613 which is a thicker vinyl created solely for the purpose of stenciling. I set my dial to the dot right after the vinyl setting. It cuts perfectly that way.
I wrote a guest post on the Expressions Vinyl Blog all about using 613 to stencil a doormat.

(4) Transferring Stencil
This is honestly the most painstaking part of making a doormat and it’s probably why a lot of people choose to use paper and pins instead. I promise you though, once you’ve done it a few times it becomes second nature. Plus, you can reuse the stencil 4-5 times and with each application it becomes easier to place on the mat.
I’ve cranked out 10 in a couple of hours by using the same 2 stencils. Trust me, it works well once you get good at it.
I don’t use transfer tape to move my stencil from the paper backing onto my doormat. I used to, but that changed when I switched to stencil vinyl. I literally just pick it up by hand and place it on my mat. Thankfully it is VERY forgiving.

(5) Painting
I think a lot of people mess up at this step. The choice of paint and brushes can pretty much make or break you. Personally, I would never recommend spray paint. I’m sure there are people that have had great success with it but those are few and far between. Outdoor acrylic paint is cheaper and easier.

Avoid using a stroking motion when you’re painting over a stencil. Always, always pounce. I use the crappiest old brush I can find because the harder the bristles, the better.

When you’re working with multiple colors make sure you save the lightest colors for the top layer. Build from the bottom up. If you have any questions just leave a comment below and I’ll help you out.


Audrey
How presh!!! Is There a tutorial for this?
Kayla
Thanks! I am working on the tutorial now! Check back soon!
Elizabeth F
I love the door mat with the coffee cups! Are those coffee cups and the saying “have a cup of cheer” in the silhouette store? I am having trouble locating them. Also, what type of paint did you use? I just love that idea!! So cute!
Kayla
Thank you, Elizabeth! The saying is not in the store but the font I used for it is. It’s called Christmas card script. The cup is from the store as well, I just changed up a basic cup and added the snowflakes. So glad you like it!
Franziska
Hi, I am also very fond of this font 😉 but I cannot find a script called Christmas card script. Did they change it’s name or isn’t it available anymore? Is this the same script you have used for your Thanksgiving menu with the wood slices?
Thank you so much
Franziska
Franziska
Ohhh, a few comments later I found that it is not available anymore – buhuuuu ;(. Thank you anyway
Nicole
It looks like this was done a few years ago but hoping this finds you… How do you end up cutting out your stencils?
Kayla
Hey! I use a die cutting machine to cut the stencils. Either the Silhouette Cameo or Cricut Explore. 🙂
Linda
Love this!!! For the cup part, did you have to move the sections down and match it up so there was no space In between colors?
Kayla
Yes, thats exactly what I do! So glad you like it!
Vanessa
Thanks for sharing love it!!! Hope to see more DIY 🙂
Kayla
Thank you!!
Sandra
I’ve searched and searched for Christmas Card Script and can only find Merry Christmas Script. Do you happen to have the number? Many thanks!
Kayla
Hi Sandra, it looks like they took it out of the store. I can’t find it anymore either. 🙁 try holiday spirit or merry christmas script, they are pretty similair.
Bailey
With using acrylic paint how does it hold up in snow and rain?
I love this and make to want one but I’m scared the paint will fade or wash away 🙁
Kayla
I’m not 100% sure because my porch is covered and mine has not been exposed to any weather. I’m pretty sure Michael’s sells outdoor acrylics!
Bailey
Oh I’ll try that!!
Thank you!!
Kayla
Of course! Come back and let me know how it works!
Wendy
How did you remove the overlap of paint inside the font letters?
Liz
Gorgeous mats! My SIL sent me here so I can make her one 😂 And I’m so glad she did. You have a gorgeous blog!
Kayla
thank you!! So happy you’re here! 🙂
Carol
Hi 🙂 Did you need to seal this with anything or did the acrylic hold up? Thanks!!
Kayla
Through trial and error I decided it is best to seal them. I use a thin layer of mod podge after the paint dries, before taking the stencil off. 🙂
Desirae
If the lines are not clean and crisp how do you fix that? Do you have a method of removing and starting over on same mat?
Brittney S.
This is great! I’d love to get into making these myself. Do you have an electronic cutting machine you’d recommend? Preferably something affordable (if possible haha). P.S. LOVE YOUR SITE! It’s really inspired me to create a blog/shop of my own 🙂
Kayla
Aw, thank you! I definitely recommend getting the Cricut Explore Air 2! You can find great sales every now and then!
Shannon
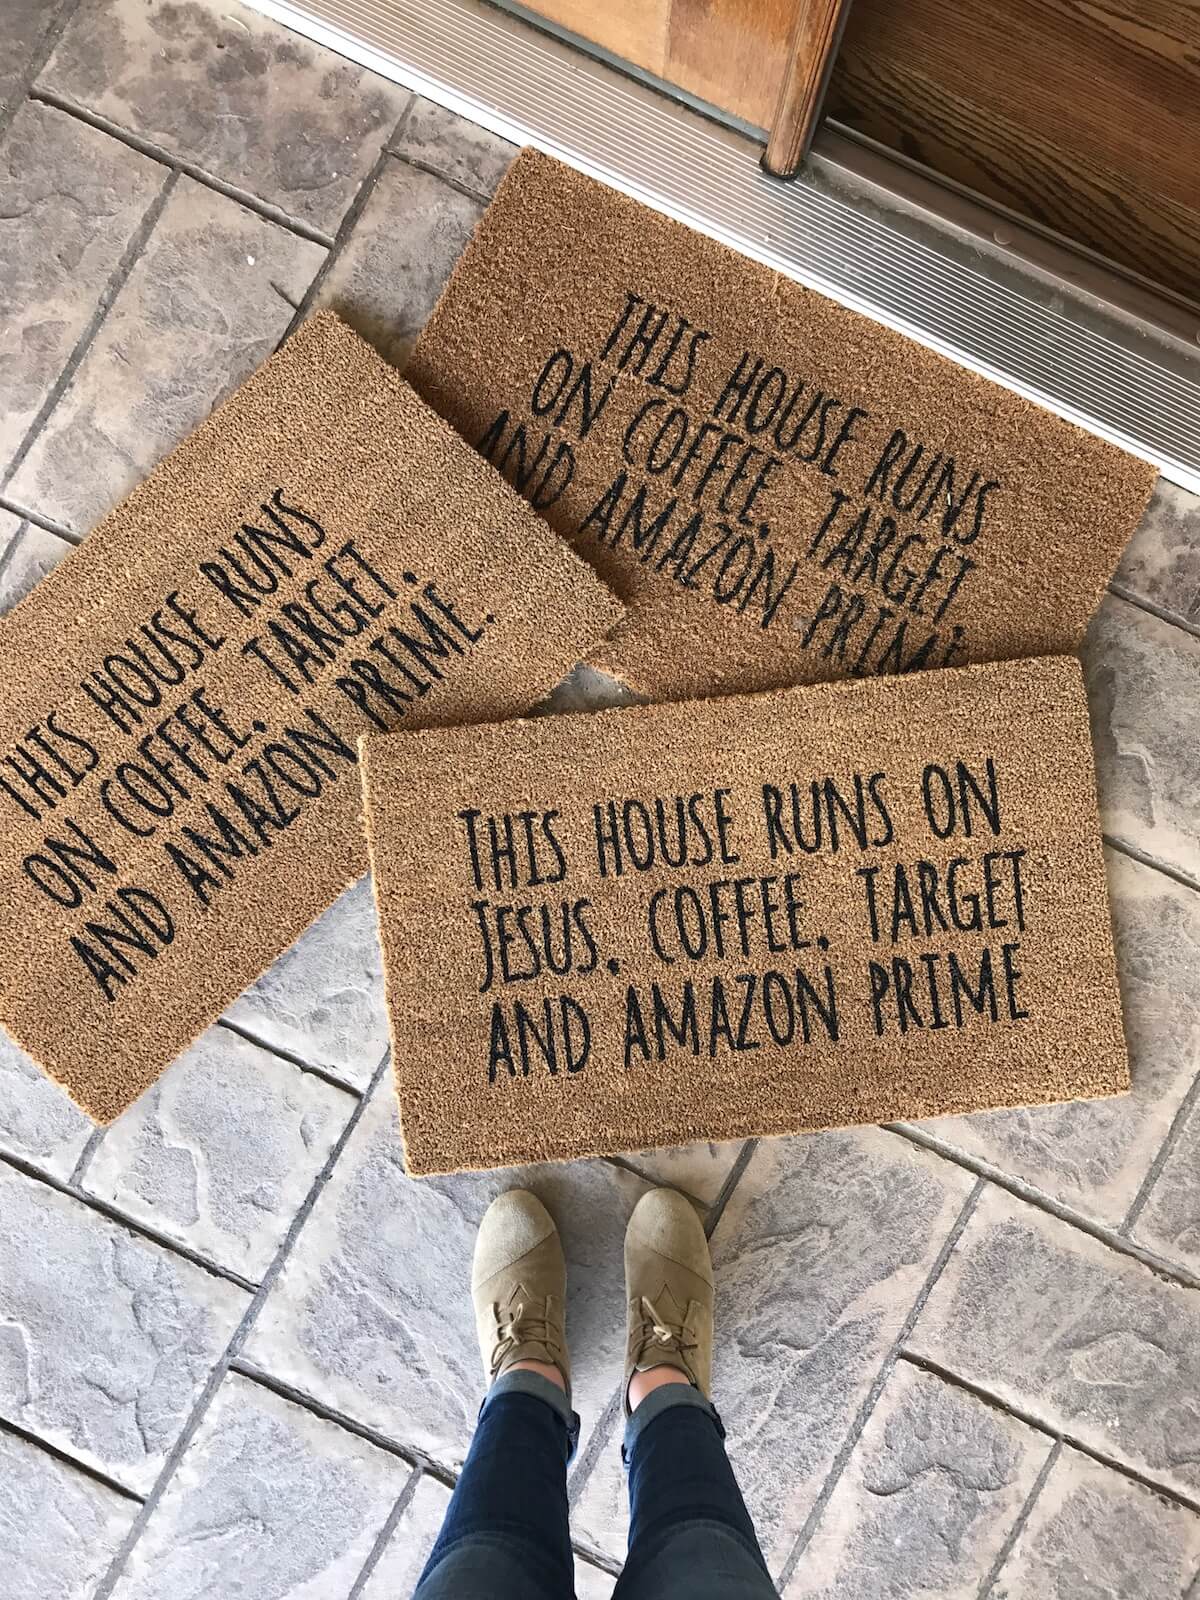
Very cute doormats! Do you happen to know what font you used for the “This house runs on” mat? Thanks!
Ashlea Davis
These are so lovely! I just have a quick question, can you use a waterproofing spray over the top of it? I live in Aus, and it can often get very wet. What would you suggest?
Kayla
Thank you, Ashlea! After the last coat of black paint is dry I go over the whole stencil again with a thin layer of Mod Podge. It dries clear and helps to waterproof the paint. If you can’t find Mod Podge just look for outdoor paint. It should be waterproof. 🙂
Anonymous
How big did you make your text and the cup?
Hilary
Love these! How big did you make your font and the cup?
Kayla
Thanks! The font size is 181 and the cup is 4.5 inches wide. Hope that helps!
Courtney
Hi! These are amazing! I want to make the coffee, target and amazon prime mat. If you don’t mind, what font is that?
Kayla
Hey! Thanks! The font is by scrap-n-fonts and it’s called ZP Eeny Meeny Miny Moe.
Laura
What is the name of the cup in the store? I see so many but can’t find the one that you might be using with the black on the bottom?
Kayla
Hi Laura, are you looking in the Silhouette Store? It’s called merry christmas coffee. I just double checked and its still available for download there.
Laura
Thanks Kayla. I found it. I did do one mat. Won’t lie the letters were a real pain. I had used Oracle 631 and that was not fun! So when I cut the cup parts out I used 651 and that helped. The snowflake was very hard too. I don’t think I got those crisp lines for it. But in the end I love it! What vinyl do you use for your stencil? Any tips you can give me I would greatly appreciate it~
Kayla
Laura, I’m SO happy that you tried it! The first time is the worst, I promise. After that you become a pro. One day I had to get out 8 orders for the Christmas cup mat and it only took me a couple of hours because I had my own process in place. I use 651 for my stencils and reuse them around 4-5 times before making a new one. It actually becomes easier to use the second or third time around. Oh and the snowflakes on my mats are done with heat transfer vinyl. Painting them was nearly impossible!
Janesse Rearden
I did one with indoor outdoor paint. Didn’t see your Madge pode idea till I was finished. Mine is just a monogram with out names. Next time I will do modfe podge. I’m tempted to go ahead and do it with a small paint brush. I thought about scotch gaurd. Maybe I will try it. What do I have to loose?
I love love the cups. I may try one like that for Christmas
orah
hi! just stumbled onto this and love it! is this a stencil that i can print from a website? how did you go about getting the whole stencil part figured out?
Kimberly
Hi, I love your blog! Quick question, any suggestions on shipping methods and how to package them?
Kayla
Thanks! I haven’t had much luck with shipping, it always ends up costing between $18-25. I have seen people sandwich the mats between two pieces of cardboard and tape around the edges then ship it flat. You could try that!
Brittany
Hi! Wanted to share how I ship my mate! I roll them, attach large rubber and. I use the black contractor trash bags cut them to size and use a heat gun to seal the edges. Cost less than 10$ to ship ups!
Kayla
That’s a great way to do it! Thanks so much for the tip!
Jenn
What does the transfer paper do? I use cricut stencil vinyl on like wooden signs and things so I’m wondering if it’s the same thing or if I need to use something different for this? I LOVE this idea!!
Kayla
I just use the transfer paper to move my stencil from my cutting mat to my door mat! You could also use freezer paper or some people have luck with card stock. Thanks for stopping by!
Carrie
Hi Kayla, have you tried the adhesive back vinyl (Oramask 813) on these mats? I was thinking it might work better than the 651 vinyl. You also mentioned using the heat transfer vinyl on the snowflakes, why is this? Thanks so much!
Kayla
I actually just recently used Oramask on a doormat! You can read that post here: https://expressionsvinyl.com/blog/oramask-stencil-create-door-mat
The snowflakes were to intricate to stencil properly, thats why I opted to use the HTV. 🙂
BrandMat- Door, Floor, Printed, Rubber, Custom Logo, Welcome Mats
Thanks for Sharing Information
Brandmat.co.za is a Mats products supplier like Logo, Door, Printed, Welcome, Rubber Mats etc. Visit our website for wide variety of mats today!
jennifer
would you be able to make me a custom mat or the stencil/vinyl so i can add to one?
Vicki
How did you do centers like on the e’s so they are not blacked out
Kayla
Hi Vicki, I just placed the vinyl centers on the mat by hand and painted over them. Then when you peel them away that space is empty. They stay very well as long as you are pouncing the brush and not dragging.
Mallary
Kayla! I didn’t realize until just now that I need the machine that makes these things. I am in so much love. I will check back in when I have created my masterpiece!!! Thank you for all of the inspiration!!!
Kayla
Yes!! Please do!! I can’t wait to see what you create!
Emily
What would you recommend now that you’ve used both? Oramask? This is my next weekend project!
Kayla
Yes! The Oramask is a little thicker so it’s easier to move from the backing paper to the door mat. You’ll have to place each piece by hand but it really isn’t hard at all. Good luck!! 🙂
Jordann
Can you recommend a font for Come In & Cozy Up or could you provide an SVG?
Connie
My friend and I made a door mat. We got the blank mat at Home Depot and maybe it waz too “fuzzy?” I tried using the Oramask, but we couldn’t get it to stick to the mat at all. I ended up cutting the stencil from cardstock and painstakingly painted each letter one at a time. We did “Home Sweet Home.” Did we use the wrong kind of mat?
Kayla
Was it the coir mat? I’ve gotten a bunch from Home Depot too, the Oramask doesn’t completely adhere to the mat, it just kind of sits on top giving you a “stencil” of sorts. I hold down the area around each letter while painting. Hopefully that makes sense! I need to make a process video, it’s on my to-do list!
Dinah Sutton
Did you ever make a how to video for the door mats?
Amanda
Hey,
You mentioned you like to design in your illustrator first then to the DS.. what are you using for an illustrator?
kbrasher1130
Hey there, I use Adobe Illustrator!
Savannah
Hi Kayla! Just wanted to ask if you take custom orders for these and sell them. I wanted to make one but I don’t have all those fancy tools, so if you sell them, I’d love to order one. Also, if I do end up making one, do you have to seal the paint with spray or anything? I would think when people wipe their feet on it or it gets exposed to weather, the paint might move or chip off? Any help would be great! Thank you so much.
Kayla
Hi there! I don’t sell them anymore, it was a lot of work and shipping is pretty steep! I do seal mine with a thin coat of mod podge, I apply it after the last coat of paint is dry. It dries clear and acts as a barrier against moisture. 🙂
Jessica
I’ve made a couple mats so far. I absolutely love them. What is the best outdoor paint? I’ve tried two different kinds. And what’s the best way to get down deep in the mat?
Kayla
Hi Jessica, aren’t they fun!? I’ve had great success with outdoor acrylic paint from Michaels. I do seal the paint with a thin coat of mod podge after it dries. To get the paint down in the mat I just use a stiff paintbrush a pounce it in pretty hard.
Melissa Morgan
I am going to attempt this diy. Do you think a stencil blank would work as well as using vinyl for my stencil? And what setting on the cricut explore would you use to cut the stencil blank? Thanks for your help.
Kayla
I haven’t tried stencil material but I imagine it would work okay! Let me know how it turns out for you!
Elizabeth Kramar
O my gosh these are soo cute! Thanks for sharing this with us! 🙂
Lindsay Gore
Hi!
So for the vinyl. I have actual stencil vinyl (the blue). What is the difference between what I have and the oracle 613? I looked up oracle 613 and they had different colors?
Thanks!
Rita Ryan
Hi Kayla! I just discovered your blog, and I love it! Today I attempted the coffee cup ‘cup of cheer’ mat… my first mat ever!! It was coming out GREAT, until the last step… the white cap and the snowflake. 🙁 The small pieces in the snowflake came up when I was painting, and there was NO way I could keep them down, so I ended up pulling them and making the middle of the snowflake ‘solid’. And even still, the rest of the snowflake looks kind of ‘blobby’ and lacks definition. Otherwise, my mat looks great. Can you PLEASE share the secret of how you got your snowflakes to look so perfect?!? They don’t even look painted!! Thanks so much for sharing your knowledge and ideas! 🙂
Kayla
Hi Rita! I had the same problem. The snowflake is just too tiny! I ended up using white iron on for mine. I’ll update the post to specify! I’m so glad you’re here!
Krista Wismer
Hi there! Your work is wonderful, I’m in love with it! It totally inspired me to begin making & selling these on my own!
Couple questions..
When using heat transfer vinyl, how did you apply heat to it? Did you use a press or an actual iron with protective sheet?
Do you have Instagram that I could follow your work on?
Kayla
Hi, Krista! Thanks so much!! I use both my iron and my Cricut EasyPress, it just depends on the project! I always iron directly on the carrier sheet.
If you scroll down to the bottom of the blog page you’ll see my Instagram running across the bottom! It’s @kayla_made 🙂
jhon
I love doormats cause its the main attraction of homes. Thanks for posting about it…..great
Renata
If you have a dab of paint fall onto the coir mat, is there an easy way to remove it without messing up the mat?
Kayla
Uh oh! I honestly can’t say for sure because I didnt have it happen but I would try carefully scrubbing it with an old toothbrush and some soapy water. It’s worth a shot! Good luck!
Henry
Thanks for posting about doormats that help to maintain the home decoration and impression.
Crystal
Hi. Where do you buy your blank for mats? I’ve tried a few but haven’t found one that I really like.
Kayla
Hey! I get mine from Target, they’re $9.99!
Carmella Littlejohn
Do you have any videos of your crafts that I can watch? I’m loving your ideas and your blog.
Kayla
Thank you! I’m so glad you’re enjoying them. I don’t have videos at the moment but I am working on them!
Jennifer Vance
Can you please help? I have made a few mats for my family. Can you please tell me the best way to ship and package them to avoid damage and not spend a fortune in shipping cost?
Kayla
Hi Jennifer, I had the same issue with high shipping costs which is why I stopped selling them. I have seen other people roll the mats up, tape them with packing tape and attach the shipping label directly to the rolled mat. I’ve also seen people cut down cardboard boxes to fit the exact size of the mat and ship them that way. It’s a tough one because of the dimensions and weight. 🙁
Alicia
Love, love, love this doormat! Can’t wait to make it. I was reading through the comments and it seems like you bought the image from the silhouette store and not design space. Can you buy silhouette images and still use it with a Cricut machine? I have a Cricut air 2 and wasn’t sure
Kayla
Hey there! Thank you! The cup itself was from the silhouette store but it’s really just a plain coffee cup, I would do a google search for coffee cup SVG and just download one from there. Same goes for the snowflake. The font is called Christmas Card Script but I’m pretty sure Silhouette discontinued it. 🙁
Carol
amazing work!! I love your doormats…I hope to find them in Canada cheap like that. You say you used Oracal 613 stencil film. I have Oracal 813 that looks the same as the one in your picture above. I can’t find Oracal 613 anywhere. I know this is an old post but can you tell me if what I have is the same thing? did they change the number?
Kayla
Hi Carol, so sorry for the delayed response. Oracal 813 is the same as 613. Good luck and happy crafting!
Kayla
Hi!
Would you interested in making any and selling them? I have an idea in mind but am not sure I’d be able to do the job that you do! 🙂
Megan
Do you still use Oracal 613 for this or did it change to 813? or what is the difference? Where do you get your 613 if you still use that?
Kayla
Hey! It is 813 now, same thing. 🙂 Good luck!!
TINA GORDON
How did you clean up the extra black paint inside the letters? did you go over it with brown paint?
Kayla
Hi there, I didn’t have any areas that leaked enough for me to have to touch up. I think it would be difficult to find a paint color to match the color of the mat but you could definitely try that!
Jessica Spooner
It doesn’t look like oracle 613 is available anymore… it links to the 813, is that the same?
Kayla
It sure is!!
Sammi
Used your ideas to make my mats! Love your blog. But how do you ship them? I know it’ll be expensive but have you found a box that fits it well? Or any tips?! I have family members that aren’t local that want them!
Kayla
I tried mulitple ways and found the best way to ship them is to roll and tape them really well then attach the label directly to the outside of the mat.
Ashley Swenson
I don’t see that oracle 613 is sold anywhere? I see 813? Are they the same?
Kayla
Yes! They changed the name a couple of years ago. Same thing! 🙂
Jennifer Ramirez
Hello! Do you think this would work well on a yoga mat that would be required to be rolled when stored?
Kayla
I think the paint would crack on a yoga mat but it’s worth a shot!
Lindsey
Just made a cute one with outdoor acrylic but wondering what type of modge Podge you are using? Matte, outdoor or spray?
I’ve seen some people say it turns white when wet?
Thanks for the lovely tutorial! I’m
Kayla
I used the matte Mod Podge but my mat was under a covered porch so it never got wet! You could also do a clear sealing spray, I think that would work well!
Kelsey Peter
Hello,
Wondering what you prefer now the oramask or the oracle ? Thanks so much.
Kayla
Hey! Personally I like using Oracal 651! Both work well but that’s just my preference. 🙂
Nicole Green
With your vinyl do you heat it with a blow dryer to get it to stick to the mat, I have watched a few videos where people do that. I had success doing it but then was not able to re-use the vinyl.
Kayla
I haven’t tried that, I would imagine it make the vinyl to soft to reuse.
Laura
Hi, thanks for the info on making the mats. I have looked for Oracal 613, but only find 813. Maybe 613 is no longer made?
Laura
Oops, I just found where you answered a similar question, so please ignore my previous question. Thanks again.
Monique H
Excellent info. I just wanted to add that IKEA has doormats (Trampa) for $4.99. They do a bit of shedding, but sweeping them first seems to help.
cricut.com/setup
The Cricut is a die-cutting machine for creating crafts of all sorts. Go to cricut.com/setup and check out the materials you can cut with your Cricut machine. For such a big investment, you cannot afford to lose your way while setting up Cricut. And that is why we have gathered the steps for you. From setting up the machine, setting up the cutting mat, cleaning the mat to downloading the design software, cricut.com/setup is the only answer.
https://cricutsetjoy.com/