Summer Travel Scratch-Off Cards


Can you believe it’s almost summer?! The school year has flown by for us. It honestly feels like just the other day I was snapping photos on the first day of school. Alas, pretty soon we will all be home together and I’ll be in charge of finding daily activities to keep my oldest two children entertained and happy.
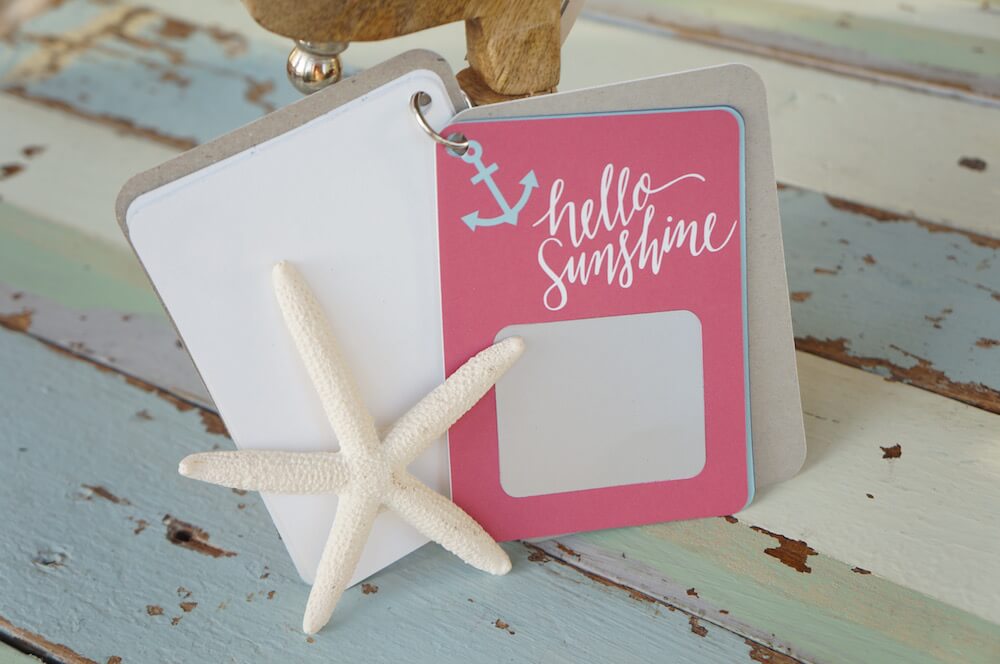
That is where CAMEO and the ever-so-amazing scratch off sticker paper come in. Using these two things you can create fun, summer travel cards to help take some of the load off when it comes to planning fun excursions outside of the house.
Here’s what you’ll need for this project:
-
CAMEO®
-
Scratch-Off Sticker Paper
-
Card Stock
-
Printer
-
Ratchet Blade
-
Cutting Mat
-
Binder ring (optional)
-
Hole Punch (optional)
Step One: Open and Edit Designs
(1)Let’s start by setting our page size to 8.5 in x 11 in and turning on the registration marks. That way, we can see exactly how much room we have to work with.
Tip: The quickest way to access the registration menu (for MAC users) is command/F3.
Now you can open up and modify your designs. For the base of the cards I’m using Design ID #41292 by Michelle Renee.
(2) Release compound path to remove unwanted shapes.
(3) Resize the card to your desired size, I chose 3 in x 4 in because I feel like thats a good size for big or little hands to hold. Now duplicate your design to fill the page by going to object>replicate>fill page. Depending on the size, you should now have 4 or more equally sized designs inside the registration guides.
Step Two: Design and Embellish
(1) Now that you have the base for your cards you get to have fun embellishing them with whatever you want! Seriously, I don’t think there is a shape in the world that you can’t find in the design store! I wanted to stick with a travel theme so I’m using Design ID’s #62272, #62073 and #62269 all by the fabulous, Lori Whitlock. I also pulled in some fun phrases by Loni Harris to complete the whimsical summer look!
(2) Now we need to create a shape to use as the scratch off section of our card. I used the rounded rectangle tool to easily draw my shape and then just duplicated it and placed them on my card bases. This is where you’ll place your hidden message to be covered by the scratch off sticker paper.
Tip: Create an extra duplicate of your shape and move it off to the side to use as the template to cut out your scratch-off sticker paper later.
(3) The last step (in this step, ha!) is to add your hidden messages or designs! You could go crazy with this part but I tried to keep my travel ideas within our general area so we could do day or weekend trips!
Tip: I duplicated my designs and simply changed the hidden messages, that way I had 8 total cards for 8 weeks of fun!
Step Three: Print and Cut
(1) Once everything is beautified you can send it to the printer and pat yourself on the back for everything you just accomplished! Because it looks amazing, right?
(2) Load your printed card stock into the CAMEO and click “send to Silhouette”, the machine will read the registration marks and cut out the cards.
Tip: When adjusting the settings in the cut settings window, select your design and click “cut edge” this way the machine will only cut around the edge of the card base and not cut out each letter, number and shape! I’ve made that mistake once or twice!
Step Four: Cut and Apply Scratch-Off Sticker Paper
(1) Remember that little shape you sat aside, now is his time to shine. Use that shape to fill a new 8.5 in x 11 in design page.
(2) Load the scratch off sticker paper onto your cutting mat and into the machine. Adjust your blade to a 2 and cut out the stickers!
(3) Place the scratch-off stickers over the hidden messages! I love this part! It brings everything together!
Optional Step Four: Punch Holes and Add Binder Ring
This part is totally up to you! There are so many ways you can attach these little cards together but I went with the easiest way for me! A hole punch and a tiny binder ring! Voila– you now have a stack of super cute summer travel scratch-off cards!
And they work!! I feel like a magician when I use scratch-off paper!!
Don’t sit at home bored all summer when you can simply pick a card and scratch-off a new destination! 🙂
Happy crafting!!


