DIY Cake Topper
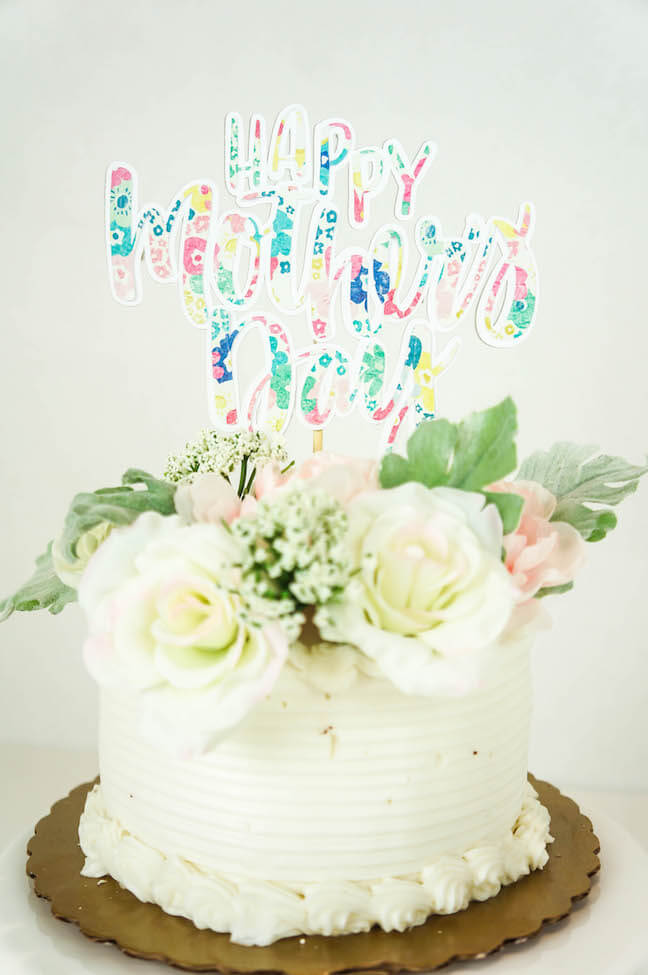
I just love Mother’s Day! It’s the one day out of the year where the whole family scrambles to make Mom feel like she’s the greatest thing since yoga pants! It’s also an excuse to eat cake and not feel bad about it! I turned this week’s free shape into the sweetest cake topper so you too can pretend every day is Mother’s Day and #eatallthecake! 🙂
Let me show you how to make your own cake topper using Silhouette’s chipboard and adhesive card stock.
You Will Need:
- Silhouette Cameo® (or Portrait)
- Silhouette Chipboard
- Silhouette Adhesive Cardstock
- Patterned Paper
- Glue
- Wooden Skewer or Straw
STEP ONE: EDIT YOUR DESIGN
(1) Open your design in Silhouette Studio and resize it to your desired size.
(2) Open the offset window and increase the offset distance to 0.165.
Note: increasing the offset is going to give you a solid background behind the shape so that the cake topper cuts out as one whole piece.
(3) Deselect the original shape in the cut settings window or simply drag it off of the design page leaving behind just the offset.
STEP TWO: CUT OUT PIECES
For the back layer of our cake topper we’re going to use Silhouette’s chipboard. It’s nice and sturdy and will hold up well against all of that yummy frosting!
(1) Attach a sheet of chipboard to your cutting mat, select chipboard in the cut settings window and adjust your blade accordingly.
(2) Load the media into your machine.
(3) Select “Send to Silhouette” to cut.
Creating the second piece of your cake topper is as easy as loading in your new media and repeating the cut.
There are so many options when it comes to creating the second layer (or you could even leave it as is). However, I chose to go with adhesive-backed cardstock. It’s a little thicker then traditional card stock and the adhesive backing makes it super simple to attach to the first layer.
So, leave your design in Silhouette Studio® just as it was above, but don’t forget to change your cut settings to the recommended setting for Adhesive-Backed Cardstock. Then it’s as simple as loading your media into the machine and repeating the cut.
For the final layer of the cake topper you’ll need to:
(1) Delete (or move) the offset and move the original design back to the design board.
(4) Adjust your cut settings for your desired media and cut out the original design to create the final layer.
This is where you can get as creative as you’d like! I’ve been waiting for the right project to use this floral scrapbook paper and I love the way the words look against the white background.
STEP THREE: ADHERE YOUR DESIGN
This part is pretty self-explanatory. I just used a trusty glue stick to attach the floral wording to the card-stock layer (which I first attached to the chipboard).
Now you can use a little hot glue on the back of the shape to attach your wooden skewer (or a pretty paper straw!).
STEP FOUR: BAKE A CAKE!
Okay, you don’t really have to bake a cake but you’re going to want to! It’s so fun seeing your custom made cake topper on top of a pretty cake!
(It’s even better when you get to eat the whole thing!)
Happy crafting!



Kia
Hi. So just curious. How long did this process take you to complete? I am considering buying a Silhouette and I am just wondering how long it would take me to do something like this if I am new to the machine?
Kayla
Hi there, things like this go pretty quickly. Being brand new to the machine it would probably take you 20-30 mins. 🙂
Leah
This is stunning. Could I ask what font you used? Thanks
Kayla
Thank you, Leah. This was a pre-made design from the Silhouette Design Store! Use the search option and search Happy Mother’s Day. 🙂
Parisa
Hi! Absolutely love this idea and you’ve explained it really well. A friend of mine needs a cake topper so I may try this. Would you be able to tell me what font you used to write out the “Mother’s Day” part pls?
Thanks so much for sharing, can’t wait to try it!
Kayla
Thank you, Parisa. This was a pre-made design from the Silhouette Design Store! Use the search option and search Happy Mother’s Day. 🙂
Charlotte
Hello. Love this so much! What is the thickness of the chipboard you used?
Thank you!
Kayla
Thank you, Charlotte! The chipboard from Silhouette is 0.4mm thick.
Geri fortune
Hi beautiful design 🌷 May I ask which type of blade you used?
Kayla
Thanks Geri! I used the standard cutting blade that comes with the CAMEO.
LaRhonda Turner
Can I use just glitter cardstock only and not use the chipboard? Also, I would like to know what type of cutter do I need. I am about to purchase one from Amazon now. They have bundles but I am not quite sure which is best. If you have any advise for me can you please email me back. larhondaturner@gmail.com
Kayla
Hi LaRhonda! Hopefully I’m not too late to help you choose a machine! I have worked for both Silhouette and Cricut and own all of the Cameo’s and the Cricut Explore Air II. The Explore is my favorite machine to date because its simply a better quality machine but if you’re a first timer I suggest starting with the Cameo 2. The Cameo 3 is overpriced and doesn’t do anything different than the 2.
You can definitely just use glitter card stock for the cake topper, I would layer several pieces together to make it thicker and sturdier.
Amanda Warner
The font looks similar to Hello Beautiful Bold from Cameo’s Store.
I was wondering where you got the paper, I need this for a friend please and thank you!
Kayla
Hey there! All of these papers were from Michael’s. 🙂